Pages

Friday, May 4, 2012

a tisket a tasket......lalalaaa.
My coil baskets !
Most importantly...Grandma's buttons....along with new ones too
I see things that just make me want to use all my brain cells (mostly) at one time and  work my creative gene pool into a real Olympic whirlpool of ideas !( some people call it 'motivation'....)
                                                      *
buttons are so much fun to 'play' with and just add more emotional spark to any (my) designs.....plus I've got this endless supply of old random buttons ~ but you know, when I start digging through them they may look unimpressive but after two or three passes they start to take on certain qualities when paired with other forgotten closures.....group them together and  "Oh very cool"..... I love the 'music ' I hear when my designs come together and actually 'sing'....pure sweetness and sugar.....aaaaahhhhh
                                               *
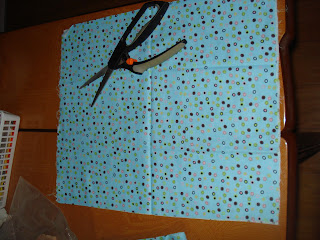
these baskets are made with the basic 'coiling' technique.....I'm sure there are instructions somewhere out in space but like most projects I just limp along till I like what I see...I use fabric that makes me smile and cut it with my rotary cutter ( have band aids close by) into 1" strips and about 12" long....or they get snaggeled ( it's a word) all up around the bottom  part of the rope whilest you are working on the top ...
**oh, stick glue is helpful to hold the ends down along with a clothes pin or clippy thing
my theory is if you can make one design then there are usually a bunch (technical term) of others to be had....'just go with the flow'
****
stuff you need; fun cotton or cotton blend fabric,  soft clothes line (not the plastic), glue stick , clippy thingy, thread, sewing machine that does the 'zig zag' stitch (important !)
* there are many choices for the rope, including a product the fabric stores sell, but being a penny pincher (really a 'sqweezer') I go for the less expensive product because I tend to get a bit carried away and make hundreds of things so I need to keep costs down so I don't end up homeless with my sewing machine and a really long extension cord(s).........
you can use most rope that is soft enough to sew on, like clothesline...I found this at WalMart in the hardware/boating section with other rope choices
start coiling the fabric at a slight angle and tack some glue on it to secure...note; the little clippy thingy
* clippy thingy is used on your very last fabric wrap because when you decide where your end is going to be you have to unwrap it
about an 1"' and cut the rope on the diagonal and wrap over it to cover....


after gluing end of one strip you can easily start another, at the same angle and also in the same direction (!)  oh (!) it is most fun to combine patterns cause you never know what it will look like when it's done ~ really, I've used the most ridiculous patterns but kept the colors alike and it worked just fine !  My fav is Christmas colors cause you can add some fun doodads (aka; all the little stuff your husband keeps asking "what are keeping that crap for ?") to  each basket

aaaaaaahhhhh...the tricky part is to NOT to sew your fingers....
and always have the end on the left with the rest of the rope length along the right
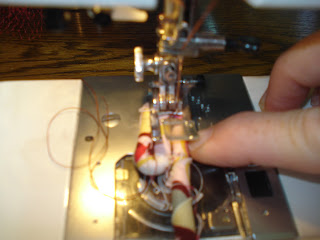
start your zig zag at a width that will attach the two sides evenly and while you sew (which tends to make my eyes cross....a lot ) you have to keep the line on the presser foot lined up the the space between your coils......always ...this gives you equal space on both sides of coil ...and it looks professional when you are done.

ok so no one is here to photograph me so make believe my right hand is still holding the right side firmly so that my left hand is putting constant pressure (like your left pointer/index finger is your 'guide' ) to make sure your basket has a bit of  'stiffness' to it when it's finished....floppy baskets are just not cute
you can coil till your hearts desire and make loopy loops or handles ~ ahhhh the possibilities are endless (well not really there is a number of them)
to end your endless rows you pick a spot on the basket that's not so obvious that it shows ....then stitch over the fabric, back and forth ( and forth and back) to secure it all so there is no 'unraveling' ~   ( best left to us humans)

the fun begins ; decorate as the mood strikes !!!
* tip:  I ALWAYS sew my embellishments on..... I never use glue because it is so unreliable ( oh, and looks yucky too)


Thursday, May 3, 2012

Temporary Insanity
* * *
so...here I am shopping (in the Clearance Rack , what else) and stumble upon a  ' Groovy ' Beatles T !!!   Love it....but not so much as a shirt....hhhmmmmm.....my mind is a hummin'..(people start noticing the smoke around my head) ...ah ha !!! I will make a 'hippy bag' ! well it was only $4.80 so I HAD to get it (!)

cut out a shape for the base/bottom....I used leather first then thought...."uuugghh...well now I can't throw it in the wash!"  .....so I made the bottom with a piece (without that red sqiggle I would not know about the "i" / "e" debacle )
Alas, no photo....


cut and sew
leaving bottom open to attach to .....the bottom....(?)

sewing sides to bottom
*note; sewing on T shirt knit type fabric is a bit tricky for the novice....you really need a ball point needle so it won't cut into the fabric and leave holes....plus adjusting your machine for the stretch stitch is usually a good idea

lining fabric
whatever you have around, even a pillow case or another old shirt you ( or someone that won't notice that their shirt is gone) don't wear anymore works really well...but NOT  another stretchy knit ...2 stretchy fabrics together just gets out of control !
cut same size as shirt/bag/purse

OOOHH....Pockets are fun !!

sew lining to pocket piece and turn right side out leaving opening on the bottom  so it will get stitched  closed when  sewn to lining fabric
I turned to the top edge down a bit....cause I can
*** IMPORTANT SAFETY NOTE; sew sides of lining together AFTER sewing pockets on
cut a bottom pce. (hehe)...same size as before,  to sew to the ....bottom.....

pin lining to inside
important to gather/stretch as needed to fit....NEVER EVER is the lining and the  outside the same size  !!!  I don't care if you cut them the same time ...use the same pattern....TRUST ME... I've been doing this forever and it is NEVER THE SAME SIZE..... you will always have to 'finese' the pieces(ha spelled it right the first try) together

the top side, what used to be the shoulders, is now the part to fold around your  handle
I just happen to have this handle from old and forgotten ideas that I shoved into the closet
this gets stitched in a tight 'zig/zag' pattern for strength

or a grommet type button/snap thingy can be used BUT needs to be reinforced with facings and stabilizers or the fabric with stretch and pull away from the snap thing and your bag with fall onto the floor while you are walking (from what I have heard...not that I have found out the hard way...as usual

almost finished !  hhhmmm....looks better in person
add a bit 'o beads and what not

wheeee....all done in a few hours of 'happy time'
*
the best part of this is that it cost so little that if I didn't like the end results I wouldn't have to beat myself up over wasting my hard earned dollars....it really only took my time...and I that I have
*
thinking 'outside the box' is what really makes the world go 'round
where would we all be if we all followed the 'rules'......no place that  I would want to be that's for sure !
http://www.etsy.com/shop/NonnasSantas  = please come see my shop !

Tuesday, April 24, 2012

geez Louise!!...my options are endless !!  I have amassed  this.... shall we say  'collection' of assorted  fabrics from every imaginable venue......yard sales, second (and third ) hand shops, anonymous donors (and some actually willing to admit  they've had these clothes since 19-- something or other)  ...the challenge here is to actually find that specific piece my brain has pictured (from God only knows what) and try to piece it together for Santas glorious, one of a kind, original coat .....hhhhhmmmmm......where oh where.....well, to start, I look up lots and lots (and then even more) info that I can find on the various Regions Artists' interpretations of the Era that I've got swimming (most likely the 'back stroke')  around somewhere inside my head...from this info I try to determine what types of weave would have been used in clothing and how they would have used trims and buttons or pockets.....if he's going to be a country man or woodsy or Victorian......sooooooooo many options.....when I decide the fabric....then the trim (!) ... should I use fur or fringe or some kind of ribbon ???.......you can see this process alone could take me days...depending on my frame of mind ( I know~ scary right) I have actually ( sheesh...took me 3 tries to spell that stupid little word...."Fingers Unite") put a whole coat together and then the next day just rip it all apart just to start all over.......it has to feel  just right or the rest of him just won't fit together. Most often I've got this one idea and by the time my design is shaping up it has totally changed from what I had thought of and morphed into a completely different style
( and that alone tickles me to pieces.....'i ' after 'e' but not before 'c'....??)
FYI: Santa is wearing his 'Union Suit' under all of this ~ some fabrics tend to get a bit itchy you know
I have also been known (amoungst other things that shall remain nameless...) to find one small accessory and build his entire wardrobe design around it....that's alot of fun !
On my numerous ( I don't do math) trips to these great thrift and second hand shops you can find me just touching
 (see !!) all the ( and I mean ALL)  clothing to see if will work for one thing or the other...... I've had some very sweet sales women comment ; " oh, boy now you've got your winter coats all ready for the winter ",  only to tell them sheepishly that I am planning on ripping these perfectly good specimens of the fashion world  to bits and pieces (!) and I can never really tell what they are thinking as I walk out the door......
The next challenge is to get my hesitant sewing machine to cooperate with my plans ........I really do believe there is some  little gremlin in there sabotaging  my many attempts and then bragging about it to his pals over a beer......really...AND  swearing at it really does help....anyway......as you can see I have this love/hate thing going on with my machine.....maybe it could just be that my fingers don't listen to one thing my brain is doing....( I know ~ but I can't afford a therapist)  I cut up these bits and pieces and make them into this tiny coat based on my years and years of fashion design (hehe ...I have sewn my own clothes since I was a kid thinking I would be famous one day) I need to have several 'fittings' for him so it all lays just so.....I always hand sew everything and only glue stuff when it is just gets impossible to get a needle in some places. It is really important to me that my designs look 'natural' and 'life like' and I take great pride when I achieve that for each Santa !

http://www.etsy.com/shop/NonnasSantas  = this is my shop

Saturday, April 21, 2012

my mom would be sooo proud I actually remembered what she taught me  AND  it resembles  what I intended it to !!  Yay !
knitting these cuties has definitely burned some of my brain cells 
( a shame too, since I have so little left)
yet another example of what I thought (silly me) would be a 'simple task'.......HAHAAAAAAAA!!
( the knitting God's giggle !)  you would have to actually be there and witness my so called 'talent' in action.....I tend to read aloud (very loud.... thinking someone will have the answer and then tell me !) OVER AND OVER....that seems to help the instructions seep into the functioning part of my brain....it works .....on occasion. and then...."OOOHHHHHH"...you can actually see the light go on inside my head, really.   so taadaaa!!  we have little tiny stockings for Santa to carry with him, you know, just in case someone fell asleep and forgot to leave theirs out.....it could happen ~ the one that is not like the others, (ok now that song is in stuck in my head)....that one is inside out waiting to be sewn....I must have run off and of course forgot was I was doing so I started another project....OH (!) now I remember...I've started another head ! aaahaa!!  it all evens up in the end ....when it counts.
http://www.etsy.com/people/alane123?ref=si_pr    = this is my shop

Wednesday, April 18, 2012

again and again and again..........over and over and over  ....santas' face gets mashed, smooshed,  poked, pulled ....it is a never ending process till he ends up in the oven ( they are warned ahead of time)
having his eyes 'speak' to me is the key here....and it will take me days ....working on one eye tends to get the other one moved around if I'm not careful, which is exactly what happened here.  so far all my Santas have had facial features that make you walk up to them as if you just missed something very important they said just for you (!) and you want to lean in a bit closer to catch it again......capturing that is not as easy as one would think ~  and they are not all the same.....some of them I want looking down as if to read his book of names or just off to the side so I'm constantly planning ahead ....very challenging for a person such as myself ........(I tend to fly by the seat of my pants)   ...( and WHERE  did that saying ever come from)  *  I am that person ( there may be 6 of us around somewhere)  who believes  instructions are to be referenced.................... only when there are left over pieces ~
You can find me analyzing (strange) peoples' faces....the way their eyelids droop, (compared to mine), the nose, the bags under the eyes (compared to mine)  the wrinkles around the mouth  ( compared to mine)......it is remarkable how many different shapes we humans come in ( !)  so in the end I realize that there is no wrong way to shape an eye or lips ( and most times they aren't even level with each side  ~ the real ones not my santas cause my 'OCD' gets the best of me/them  in the end )  ......our skin all droops and sags around our bones....it just depends on ones lifestyle and ancestry.......of course I  usually just  end up looking  in the mirror at my own skins poor Nordic heritage ~ it's a rapid  avalanche from the age of 16 (freckled skin has no longevity whatsoever ~)
I have tried a few of the  sculpting clay that are available but my favorite one to work detail with is the Super Sculpey, you do have to soften it abit before you work with it but the results are so worth it ! the detail you can achieve is just wonderful ! 
**If you ever what the truth about how you really look just ask any 7 year old....but make sure you have a designated driver first......
http://www.etsy.com/people/alane123?ref=si_pr   = this is my shop 

Tuesday, April 17, 2012

Santa in waiting......I had to work on a body design since starting....using a cone shape just wasn't "right"....sort of cheating  and he really needed legs (how would I get his boots on...). They are much happier with this ! (and more cooperative, too)
but this involves more clothes and time but in the end I feel better knowing he's got 'the goods'. Each time I'm creating a new Santa they seem to get 'upgraded', each one getting tweaked just a bit so he's more and more of a character you want to be with . I never want to hurt their feelings by short changing them and skipping parts.....( yes, I know .....they can't feel but this is how I think and so far they've been happy)
http://www.etsy.com/people/alane123?ref=si_pr  = this is my shop

Monday, April 16, 2012

ta da !!! (music please...)
I do as much research as I can for my Santa designs and realized (boink !)  that  these little beauties were way too expensive to include in my work sooooooooooo......in all my (so called) wisdom I decided (yes...) to MAKE IT MYSELF!
HA ! (yet again...)  found this wonderful lady demonstrating this long forgotten (maybe for good reason) craft and was willing to sacrifice her time and family member to video this process so random  idealists (me) could try it for oneself and realize exactly why there is this valued price tag on such a product........but after lots of  oh, lets just say....unprintable word choices, I actually made what seems to resemble a Vintage German Feather Tree (! ) 

see ! my first attempt at an original "German Feather Tree"

this involves tiny feathers, (really) very sticky tape (you know you are in trouble when 'they' recommend WD-40 to remove said tape residue)
http://www.etsy.com/people/alane123?ref=si_pr  =  this is my shop